


“What Internet-facing IP addresses do I have in my infrastructure?” This is a common question that security professionals ask themselves during different activities such as attack surface discovery, penetration testing, and exposure management.
In this post, we discuss how you can gain visibility into your IP addresses and why you should do so.
3 Reasons Why You Need to See All Your Exposed IP Addresses
1. To build an asset inventory
Pretty much every security program – be it vulnerability management, external attack surface management, or something else – starts with an asset inventory. That alone is reason enough to enumerate all your IP addresses. After all, you can’t secure what you don’t know you have.
2. To identify accidental exposures
Another important reason to know all your exposed IP addresses is when you want to identify and address accidental exposures—cases where internal, local assets have inadvertently become Internet-facing due to misconfigurations, shadow IT practices, or migration errors.
3. To define the penetration testing scope
Finally, knowing all your exposed IP addresses helps you define a penetration testing scope to stay compliant with vendor contracts and avoid accidentally hacking infrastructure that doesn’t belong to you. Do you have IPs that belong to the public cloud? Probably yes. Should those IPs be in the scope for penetration testing? Certainly not. Testing third-party assets is very likely to be illegal.
Not all exposed IPs are equal
The easiest way to get a list of exposed IPs is to use some cyber reconnaissance tool to detect and map them. But, as we’ve seen above, IPs are different. You’ll need to differentiate between these three groups:
- Owned IPs: IP addresses directly belonging to your organization.
- Associated IPs: IPs from shared hosting or public cloud infrastructure that are directly related to your operations but not directly owned.
- Third-party vendor IPs: IPs flagged by discovery tools because they belong to your vendors (e.g., Salesforce, HubSpot, and Google) but are beyond your control.
You are only responsible for the IPs that you own. The second group you should probably be aware of, but that’s it. And as for the third group, you can (and probably should) ignore them. So, the tool you employ needs to be able to differentiate between those.
How to See All Your Exposed IP Addresses in One Place
Attack surface management and exposure management platforms can help you identify exposed IPs by running different lookups and mapping your infrastructure. As a platform that supports exposure management, Attaxion does exactly that – it discovers all your web-facing assets, scans them for vulnerabilities, and maps them to one another. It also builds a graph that shows how all of your assets connect and associate with each other.
Attaxion’s graph lets you see all your exposed IP addresses and how they are connected to other assets.
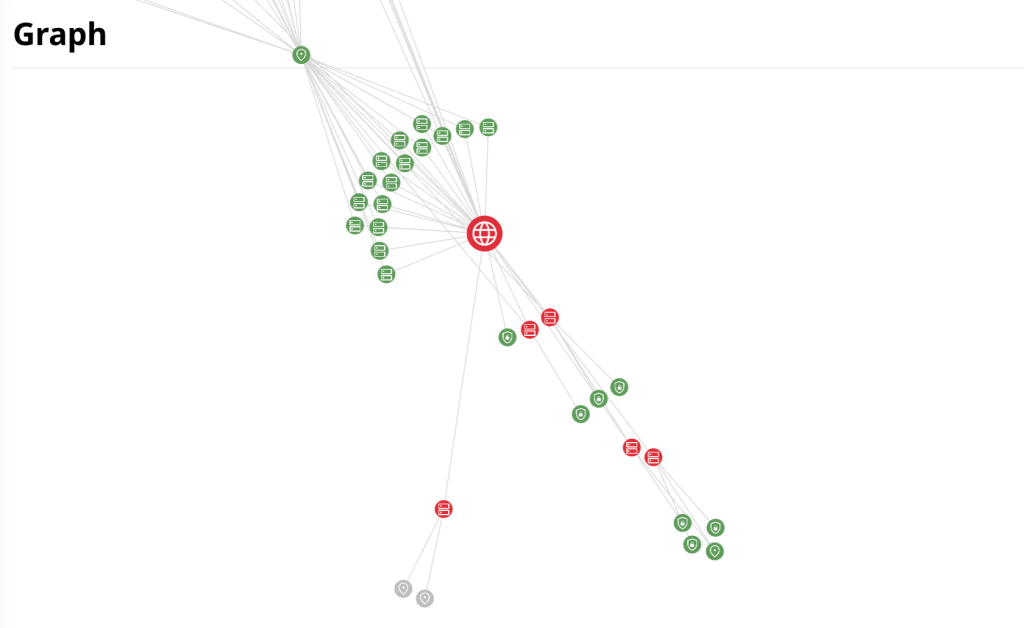
On the graph, you can see all assets, with each asset represented by different icons—IP addresses can be identified by a pin icon. Attaxion maps IP addresses to your other assets and sometimes discovers IPs that you’ve overlooked or weren’t aware of in the first place.
Attaxion’s Graph is color-coded for quick distinction between vulnerable and secure assets.
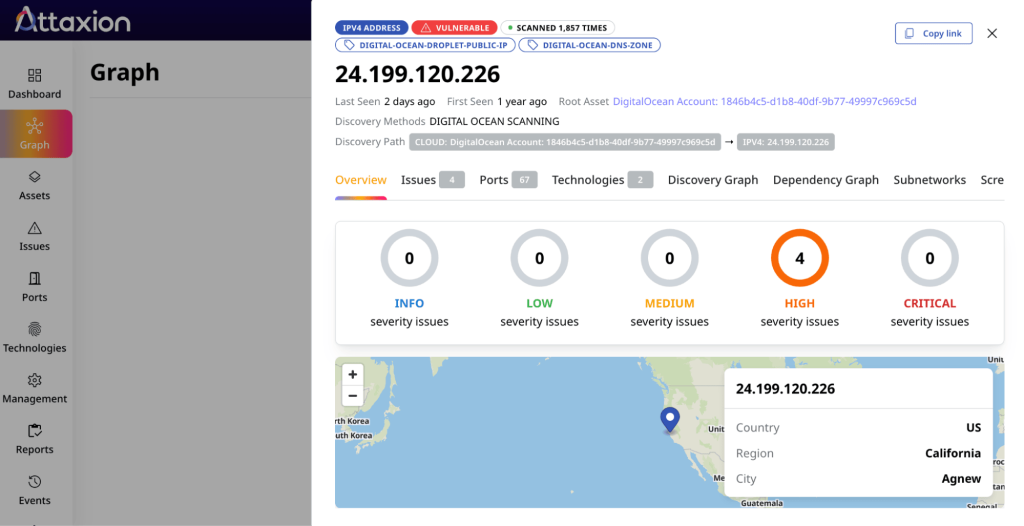
- Red. If an asset’s icon is red, that signifies detected vulnerabilities. Clicking on that icon will open the Asset Details window, which provides a breakdown of the identified security issues.
- Green. The green and red IPs are the ones that you have in your infrastructure, whether in a public cloud or on premises.
- Gray. Some other IPs are gray – these are the ones that do not belong to you, but were discovered through your assets.
Aside from this primary attack surface visualization, Attaxion provides two additional graphs for each asset—the Discovery Graph and Dependency Graph.
- Discovery Graph: This graph shows how the asset was discovered, allowing you to understand potential attack paths to it.
- Dependency Graph: This lets you see other assets that depend on a particular asset — a visualization that is useful when assessing the impact of a vulnerability.
Differentiating Between Owned and Associated IP Addresses
Attaxion further improves exposed IP visibility by automatically tagging IP addresses within their associated DNS zones and ISPs. You can see these tags on the screenshot above, as well as on the asset list, where you can filter the view by tags.
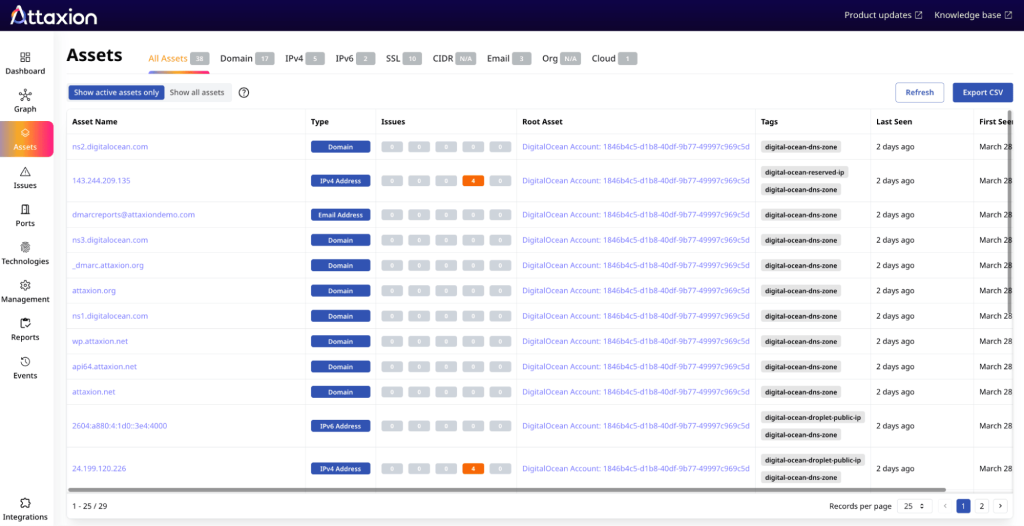
The graph and the tags provide insight into your exposed IP addresses, allowing you to determine which IP addresses are under your control so you can identify unwanted exposures and separate the IPs that need to be exposed so that you can then include them in penetration testing.
The other IPs that are part of shared or third-party public cloud environments fall outside your direct control, but you probably want to continue monitoring them – and Attaxion does that for you.
Continuous Monitoring of Exposed IP Addresses
Attaxion continuously scans and discovers your assets. This means that any new server, open port, or additional resource within your AWS account or any cloud environment is automatically identified, added to your asset inventory, and scanned for potential security issues.
With this capability, you continuously and automatically get visibility into all new infrastructure, avoid shadow IT, and maintain an updated asset inventory.
Ready to start monitoring exposed IPs with Attaxion? Sign up for Attaxion’s free 30-day trial now.